The InBox Channel on iPresso – Notifications Delivered Straight to Your Customer’s Inbox

Do you have a website or mobile app where users spend a lot of time – yet you still send your most important messages by email, only for some of them to get lost in a crowded inbox? Or maybe you want to remind customers about an abandoned cart right where they make decisions (inside the app) rather than through a separate channel?
The InBox channel in iPresso was built for situations just like these. It lets you deliver messages straight to an “inbox” built right into your app. Below, we show how it works in practice, when it’s worth using, and how it ties into the rest of your marketing automation ecosystem.
What Is the InBox Channel?
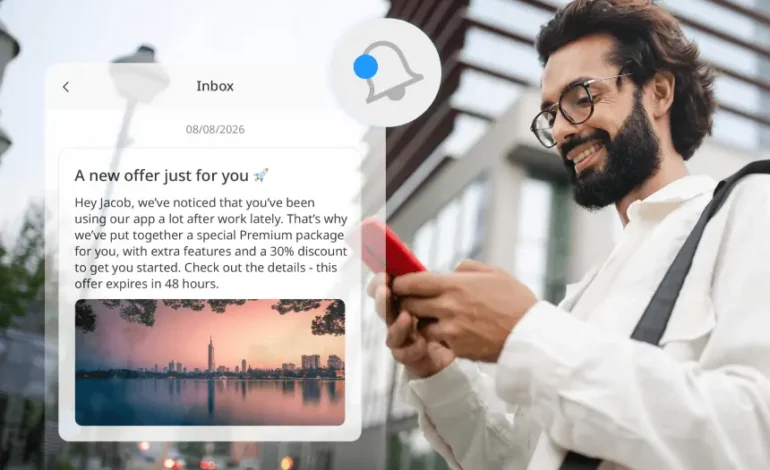
The InBox channel is a communication method where iPresso prepares a message for a specific contact and makes it available for your app to retrieve. The app fetches the content and displays it to the user. Once clicked, the user sees the full message: title, description, image, and a call-to-action button.
Here’s the key thing: what this inbox looks like inside the app is completely up to your implementation. iPresso provides the content alongside all the delivery, personalization, and reporting logic. The visual layer – colors, layout, and styling – is on your end. This gives you total control to make in-app notifications feel like a native part of the product, rather than a tacked-on banner.
Jakub Wyciślik, Marketing Automation Expert at iPresso, comments: “The biggest advantage of InBox is also what sometimes confuses clients at first. We don’t force a specific look for the notifications. We supply the content, personalization, and full reporting, while the client’s product team designs how the notification bell actually looks in the app. Because of that, the message fits right into the interface as if it was part of it from day one”.
Push Notifications vs. InBox Channel: What’s the Difference?
This question comes up every single time, so let’s clear it up right away. In terms of communication mechanics, the InBox channel is quite similar to on-site and in-app messaging. It isn’t a push-style channel where the system “forces” a notification onto the user at any given moment. Instead, InBox operates on a pull-based model: iPresso generates the message and holds it ready for retrieval, and your app fetches it whenever the user actually interacts with it.
The practical takeaway is that your message appears right when the user is already inside your product and ready to engage. You aren’t interrupting their dinner with a ping on their phone. Instead, you leave a message in an inbox that they can open on their own terms when they have the time. For many types of communication – whether informative, transactional, or upsell – this is a healthier, far less intrusive way to connect than a traditional push notification.
As Jakub Wyciślik notes: “Push is great for urgent matters, but it can easily feel intrusive, causing people to turn off notifications altogether. InBox works differently. The message waits quietly in the inbox, and users open it when they’re ready. That means less frustration for the recipient, while your messages land right where decisions are already being made”.
How Does InBox Work in Practice? Four Concepts Worth Knowing
Before you send your first message, it helps to understand four key concepts. They might sound technical, but in practice, they boil down to straightforward roles.
An InBox instance is a single mailbox where you send your messages. Your app simply asks iPresso: “What do you have for contact X in instance Y?”. Importantly, a single app can handle multiple instances at the same time. This unlocks some very practical scenarios – for example, you can maintain one inbox for system alerts and a separate one for marketing messages so they don’t mix up, giving users two distinct streams.
An InBox application refers to your specific web or mobile app on the client side. Once defined in the system, you link it to a selected instance. From that moment on, all broadcasts sent to that instance are available by default to every connected app. Each time the app reaches out to iPresso, it “introduces itself” using its API key.
An InBox message delivery is an individual campaign asset – the equivalent of a send-out in other channels. You can target contacts within a specific segment, send to everyone registered in a given instance, or trigger it individually via API, an automation scenario, or an abandonment recovery flow.
InBox instance registration is a prerequisite. A contact has to be registered to a specific instance to receive messages through it in the first place. This isn’t just a formality – it’s your control mechanism over who actually gets into a given inbox.
You define instances and applications directly in the customer portal under Channel Settings → Inbox. Every instance and application has its own name (purely for your convenience in the dashboard) and an API key. That API key is what actually controls access: the instance needs it so the app can fetch its messages, and the app presents its key with every request it makes.
When Is It Worth Using the InBox Channel?
Rather than listing the obvious, let’s look at the specific problems this channel actually solves.
If you run an e-commerce store or a service with its own app, InBox works brilliantly for upselling and recovering abandoned processes. Did a customer leave their cart behind or stop halfway through a form? Instead of sending an email that has to compete with dozens of others, you leave a reminder right in their app’s inbox, complete with a button that takes them straight to checkout. The message is waiting right where they’ll naturally return anyway.
If you care about communication that doesn’t annoy people, InBox offers a much calmer touchpoint than push notifications. Order status updates, new feature announcements, trial expiry reminders – all of these can sit quietly in the inbox instead of making the phone vibrate.
If you’re building a loyalty program or managing vouchers, you can deliver a personalized promo code or a direct offer link tailored to that specific contact. In fact, that’s exactly what the documentation shows: a message with a title, description, promo code, and a call-to-action button leading straight to a special deal.
Finally, if you handle multiple types of communication, you can leverage the fact that a single app supports multiple instances. Keep system alerts in one inbox and marketing content in another. Your users get a clean, organized experience, while you get clear, separated reporting.
How to Register a Contact in InBox?
Registering a contact in InBox is a prerequisite for them to receive anything at all. iPresso offers three ways to do this, allowing you to match the method to your scale.
Manually, in Contact Manager. From the contact editing screen, you can toggle registration for any instance on or off with a single slider. The contact data preview features an indicator showing which instances they’re currently subscribed to. On top of that, system users can preview the messages currently generated and available for a contact within a specific instance – a feature that’s extremely handy for troubleshooting whether someone actually sees what they’re supposed to see. This approach is ideal for individual cases and testing.
In bulk, via a dedicated segment action. Once you build a segment, you can run built-in actions on it like “Register to InBox” or “Remove from InBox” – subscribing or unsubscribing an entire group of contacts from a chosen instance all at once. It’s a natural way to manage your audience based on business rules. For example, you can enroll users in a “Premium Offers” inbox only if they meet specific segment criteria.
Automatically, via REST API v2.
Every change in registration status leaves an audit trail. Subscribing to or unsubscribing from InBox creates a contact activity that shows up right in their activity history. This means you have a complete paper trail: exactly when and to which inbox a given contact was added or removed.
Here’s how Jakub Wyciślik puts it: “Registration isn’t red tape, but it’s real control over who receives what. You can manage it manually for an individual contact, in bulk across a segment, or automatically via API when syncing with the customer’s system. And because every opt-in and opt-out is logged as an activity, you always know exactly why someone ended up in a given inbox”.
How Do You Create an InBox Send-Out?
Creating an InBox send-out feels just like working with any other iPresso channel – you simply walk through a few screens: Content, Settings, and Summary. Let’s break it down into the parts that actually matter for your daily workflow.
Message Content
Every InBox send-out requires three core fields:
- Title – The main heading of the notification. Up to 255 characters.
- Lead – A brief text preview. We recommend keeping this as a concise preview that users can see in their inbox list before opening the message. Up to 500 characters.
- Content – The full text payload that users see once they open the message. Up to 1,000 characters.
On top of these, you have optional fields that are almost always worth considering, since they’re what actually turn a plain message into real action:
- Call To Action – the button. It consists of button text (up to 255 characters) and one of two link types. A CTA link is a standard https:// URL, tracked via iPresso’s built-in link tracking – recommended for web apps. A CTA deep link uses an app protocol, making it the go-to choice for mobile apps. While the link itself isn’t tracked directly, the system generates an additional endpoint so the app can report back every click.
- Visuals – two separate images. Icon URL is a small visual, like an icon in the inbox list. Image URL is a full-sized graphic displayed inside the opened message. Both fields accept URLs up to 1,000 characters.
All fields support standard text personalization, just like other iPresso channels (note that personalization applies to text, not HTML). In practice, this means you can insert the recipient’s name, profile data, last purchase, or a unique promo code right into the title, body, or even the CTA link. It uses the exact same parsing logic you already know from emails and SMS – so there’s zero learning curve.
Before launching a campaign to production, you can send a test broadcast to a designated test contact. The requirement is simple: the contact must be registered in the given instance and flagged as a test contact. Once selected, you’ll get a visual preview of how the message might look, along with a sample JSON payload that the InBox app will receive. It’s a super handy step that lets your implementation team see the exact structure of the data they’ll be working with.
Send-Out Settings
The second step of building a creation is setting things up, split across a few key sections.
In basic information, you give your campaign a name (required – you can’t send without it), an optional description visible in the campaign list, and tags.
In InBox configuration, you choose the instance for which the messages will be generated. You can also narrow down the send-out to specific apps connected to that instance. By default, messages are available across all linked apps, but if you want specific content to appear only on mobile or within a particular product, you have full control.
In the Send-Out section, you pick your delivery mode. There are four modes to choose from:
- AdHoc – immediate send-out to all contacts registered in the instance or to a specific segment.
- Scheduled – same idea, but set for a specific date and time down the road.
- For Scenarios – available directly within a dedicated block in your marketing automation scenarios.
- Via API – triggered using an API key, targeted at specific contacts via REST or JS API, or executed inside a dedicated abandonment recovery block.
It’s precisely these modes that keep InBox from being an isolated island – making it an integral piece of a much bigger puzzle, which we’ll cover in a moment.
Expiration Dates and Control Groups
Two features in the advanced section are important enough to warrant a closer look.
First off, InBox messages are never open-ended – they always require an expiration date. This is completely by design, ensuring a user’s inbox doesn’t pile up indefinitely with old, outdated communications. You can either set a fixed date after which all messages from that send-out vanish, or set a rolling interval (in hours or days) calculated from the moment of dispatch, giving each message its own shelf life. That second option is particularly useful for scenario-based and API send-outs, where dispatch times can vary greatly for each recipient. It’s also worth keeping in mind that the maximum availability period depends on whether the content is personalized – such messages have a shorter allowed lifespan, with exact limits tied to your account settings.
Second, you can specify a control group segment. Contacts within this group are excluded from the generation process, effectively canceling the send-out for them. It’s a standard approach for measuring a campaign’s true impact – comparing the behavior of people who got the message against those who didn’t. Just one quick practical heads-up: changing the control group won’t affect messages that have already been generated.
How Do You Measure InBox Performance?
InBox reporting aligns perfectly with other iPresso channels, so if you’re familiar with email reports, you’ll feel right at home. The main difference lies in event naming, which is tailored to the pull-based nature of the channel. Here’s what you actually track:
- Generated – the equivalent of “Sent” in other channels. It uses a different name because iPresso doesn’t push the message directly; instead, it generates and exposes it. This status is assigned automatically by the system.
- Canceled – just like in other channels, this is set by the system, for example, if a contact ends up in a control group.
- Delivered – means the message was retrieved by one of the InBox apps. This can be marked automatically when the full message list is retrieved, or reported by the app via a separate call.
- Read – the message was opened. The app must report this status via a dedicated request.
- Clicked – the user clicked a link or deep link. This happens either when a standard tracked CTA link is opened, or when the app hits the dedicated endpoint generated for a deep link.
- Deleted – the recipient removed the message from their inbox. The system flags this automatically when processing the delete request.
Here’s one practical nuance that saves you from misinterpreting your data. Generation, delivery, cancellation, and deletion naturally happen just once. Open events can occur multiple times – a user might go back to the same message repeatedly – but the report only counts the very first open. Clicks are the only events tracked multiple times as activities (every single click logs a separate entry), even though the report metric itself only increments on the first click. This keeps your deliverability and open stats from getting artificially inflated, while still giving you a complete view of link engagement.
Jakub Wyciślik says: “We were very intentional in naming the first status ‘Generated’ rather than ‘Sent’. In a pull-based channel, we prepare the message and wait for the app to pick it up. ‘Delivered’ only happens when the app actually fetches the content. This way, your reports never confuse a message being ready with it actually reaching the user”.
InBox and the Rest of the iPresso Ecosystem
This is where InBox truly shines. On its own, it’s a handy channel, but its real value unlocks when paired with other platform tools.
Segmentation. You can target InBox send-outs to a finely tuned segment and manage inbox registrations with that exact same logic. The segment setup you already use for email and SMS works right out of the box here, with zero learning curve.
Automation Scenarios. InBox is available as a dedicated block inside scenarios. This means an in-app notification can become a key touchpoint in a broader customer journey – for instance, a customer takes an action, the scenario waits a set amount of time, and then leaves a message right in their app inbox. The channel becomes another core tool in your automation toolkit, side-by-side with email and SMS.
Abandonment Recovery. The API delivery mode includes a dedicated abandonment recovery block. You can close the loop on abandoned carts or dropped processes with an in-app message, not just an email – catching users much closer to their buying decision.
Other Pull-Based Channels. InBox is a close relative of on-site and in-app channels. If you’re already communicating on your site or in your app, InBox is a natural extension, adding a persistent inbox on top of one-off, “on-the-fly” messages.
Link Tracking and Activity Monitoring. CTA links use the exact same tracking mechanism as other channels, while registrations, clicks, and opens are logged as contact activities. This means InBox data feeds directly into a unified view of customer behavior – ready to be used in scoring or for building your next segments.
As Jakub Wyciślik points out: “InBox really flexes its muscles in scenarios and abandonment recovery. Instead of treating in-app notifications like an isolated island, you plug them in as a next step alongside email and SMS. The customer gets a seamless experience, and you build it all in one place using the same segments and personalization”.
Wrap-Up – And the Best Way to Test It Out
The InBox channel gives you something that’s hard to achieve with email or push notifications alone: persistent, non-intrusive in-app messages that live directly inside your product, feel native to it, and pop up right where users make decisions. You have total control – from who’s subscribed to a specific inbox, to personalized copy and CTA buttons, all the way to expiration dates and control groups for tracking performance. And since InBox taps into the same segments, scenarios, personalization, and reporting as the rest of iPresso, you’re not building a separate workflow – you’re simply adding a new channel to what’s already working.
The hardest thing to convey on paper is how seamless a well-integrated notification bell looks in a live product, and how quickly you can get your first send-out up and running. So instead of reading another paragraph about it – see it in action.
Book a free iPresso demo. We’ll walk you through the InBox channel using a real-world example tailored to your app and goals, and we’ll launch your first campaign together. It’s the fastest way to test InBox in practice and see how it fits into your communication ecosystem. Drop us a line or pick a time – the rest is smooth sailing.
FAQ – Frequently Asked Questions About the InBox Channel in iPresso
What is the InBox channel in iPresso? It is a communication channel where iPresso generates a message for a specific contact and makes it available for retrieval by the client’s web or mobile application. Messages are typically presented as an inbox under a notification bell icon. The actual display style depends on the application’s implementation.
How does InBox differ from push notifications? InBox operates on a pull-based model – iPresso prepares the message, and the app fetches it when the user is actively using it. Push notifications are push-based and actively force messages out. InBox is less intrusive and presents content directly within the context of the user being inside your product.
Do I need to build the look of the InBox inbox myself? Yes. iPresso provides the content, personalization, send logic, and reporting, while the visual layer – the bell icon and inbox layout – is handled on the client’s implementation side. This gives you total control to match notifications with your app’s native design.
How do I register a contact to an InBox instance? In three ways: manually using a toggle slider in Contact Manager, in bulk via a dedicated segment action (Register/Remove to InBox), or automatically via REST API v2 using the contactInboxes field. Every registration status change is logged as a contact activity.
Can InBox messages be personalized? Yes. All fields – Title, Lead, Content, as well as CTA button text and links – support standard text personalization known from other iPresso channels. You can insert contact profile data, such as first names, recent purchases, or individual promo codes.
How long does an InBox message remain available? Messages are never open-ended and always require an expiration date. You can set either a fixed date or a rolling interval from the dispatch time (in hours or days). Maximum availability depends on whether the content is personalized and your account settings.
In which modes can InBox messages be sent? In four modes: AdHoc (immediate), Scheduled (at a specified date and time), For Scenarios (automation scenario block), and Via API (to specific contacts via REST/JS API or within an abandonment recovery block).
What events are measured in InBox reporting? Generated, Canceled, Delivered, Read, Clicked, and Deleted. Generation, Delivery, Cancellation, and Deletion are counted once. Opens can occur multiple times, but the report counts only the first open. Clicks are logged as multiple activities, though the main metric increments on the first click.
Does InBox work with other iPresso channels and features? Yes. It uses the exact same segments, personalization, link tracking, and reporting. It works within automation scenarios, abandonment recovery, and as a complement to on-site and in-app channels, allowing you to plug it into existing communication without building a separate workflow.
Where to start? The easiest way is to book a free iPresso demo – we’ll walk you through the InBox channel with a setup tailored to your app and guide you step-by-step through your first send-out.